Layouts
Relative to parent
In the basic widget functions I showed that setPosition and setSize could be given constants or a value relative to the size of the parent widget.
widget->setPosition("10%", "5%");
widget->setSize("30%", "10%");
The layout system will make sure that when the size of the parent changes, the position and size of the widget will be updated as well. This way you don’t have to update the position and sizes yourself each time the window size changes.
Because you can refer to the parent widget, one way to keep a widget centetered on the screen would be the following:
widget->setPosition("(parent.innersize - size) / 2");
An alternative solution would be to change the origin. Setting the position to (“50%, “50%”) doesn’t work by default because it will place the top-left corner of the widget in the center of the parent, but the origin can be changed from the top-left to the center of the widget to truly center the widget:
widget->setPosition("50%", "50%");
widget->setOrigin(0.5f, 0.5f);
The parameters passed to setOrigin are values from 0 to 1 that indicate which point of the widget is specified with the position (with 0 being left/top and 1 being bottom/right). The following code would place the widget at the right side of the parent while having the center of the widget at 75% of the parent size.
widget->setPosition("100%", "75%");
widget->setOrigin(1.f, 0.5f);
If the last paragraph isn’t clear enough then here is a calculation with some example numbers. Imagine the parent is a panel of size (800, 600) while the widget is a button of size (150, 40). The button would be placed on position (800 - 150, 0.75 * 600 - 0.5 * 40) = (650, 430). When the panel is resized to a width of 400 pixels then the button will automatically be moved to a left position of 400-150 = 250.
Binding other widgets
You can not only refer to the parent, but also to other widgets. In the example below, the button is positioned 50 pixels to the right of another button.
button2->setSize(bindSize(button1));
button2->setPosition({bindRight(button1) + 50.0f, bindTop(button1)});
You can achieve the same when using strings. The name of the widget used in the layout string has to match with the one given to the add function when the widget was added to the mutual parent.
group->add(button1, "ButtonName");
group->add(button2);
button2->setPosition({"ButtonName.right + 50", "ButtonName.top"});
Here is another example that positions a cancel button on the left side of the OK button, with 10 pixels padding inbetween.
cancelButton->setPosition({"OkButton.left - 10 - width", "OkButton.top"});
Available properties
The following properties are available in a layout string when referring to the parent of another widget:
| Properties | Description |
|---|---|
| x, y, pos, position | Position of the widget |
| left, top, right, bottom | Position of the widget at one specific side |
| w, h, width, height, size | Size of the widget |
| iw, ih, innerwidth, innerheight, innersize | Size of the container widget that is available to child widgets inside it |
| parent | Parent of the widget |
AutoLayout
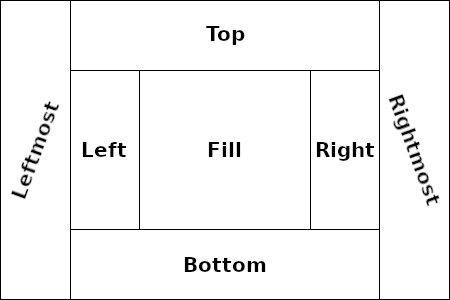
Since TGUI 1.1 there is an additional method to specify that a widget should fill one side of its parent.
The following images shows the available AutoLayout values. The Leftmost and Rightmost values are only needed if you already have a Top or Bottom widget and want to be beside them, otherwise you can just use Left and Right.

When specifying an AutoLayout other than Fill, you need so set only the width or height of the widget. The position and either the width or height are automatically calculated by the layout (e.g. a panel that is located at the Top will always have a width that fills the entire parent). Here is an example of a panel that has a fixed width and fills the right side of the screen:
sidePanel->setWidth(200);
sidePanel->setAutoLayout(tgui::AutoLayout::Right);
For the Fill layout, both the position and size are automatically calculated by the layout and shouldn’t be set manually. After all other widgets with an AutoLayout are placed, the widget with a Fill layout will occupy the remaining area.
mainPanel->setAutoLayout(tgui::AutoLayout::Fill);
Multiple widgets can be given the same AutoLayout value, you can e.g. have multiple top panels. Which widget is placed above or below the other is determined by the z-order of the widgets. The back widget will be positioned first, the front widget will appear the most towards the center. By default, the front widget is the one that was last added to the parent.
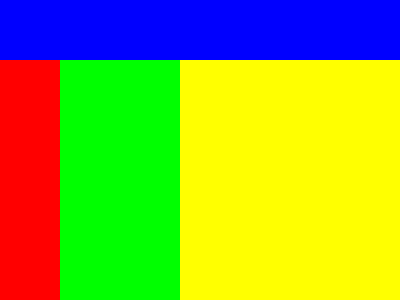
Here is an example that demonstrates how multiple widgets with an AutoLayout behave together:
red->setWidth("15%");
red->setAutoLayout(tgui::AutoLayout::Left);

green->setWidth("30%");
green->setAutoLayout(tgui::AutoLayout::Left);

blue->setHeight("20%");
blue->setAutoLayout(tgui::AutoLayout::Top);

yellow->setAutoLayout(tgui::AutoLayout::Fill);
